 I’ve been teaching myself to block felt hats for the past year now – I’m by no means an expert, having no formal teaching or training at all, but I’ve learnt a bit over the year and thought I’d post it here, for anyone who is interested, or interested in having a go themselves.
There are some great courses available where you can learn the basics, but this can be a bit costly, so I decided to try and go it alone. Everything I’ve learnt so far has been through a useful book called Design & Make Fashion Hats by Karen Henriksen, judicious use of Google, the lovely helpful girls at Atelier Millinery in Soho (who incidentally run greatcourses in hat and fascinator making), and an awful lot of trial and error.
Blocking felt hats isn’t easy, but neither is it hard if you have a bit of common sense and a lot of patience. It does though require a bit of specialist kit, which can be expensive. However, if you factor in how many hats you’ll be able to make once you’ve got your hands on a block, some felt stiffener and a good iron, it doesn’t work out too expensive, especially if like me you’re a bit of a hat fanatic. Trilbies, cloches and fedoras are already flooding into the shops for the autumn season, and you can expect to pay anything between £30-£60 for a nice one in a high-street store. This way you get the fun of making hats, as well as full control over how you want it to look. Remember though that a block has only one size setting so you will only be able to make hats in that particular size.
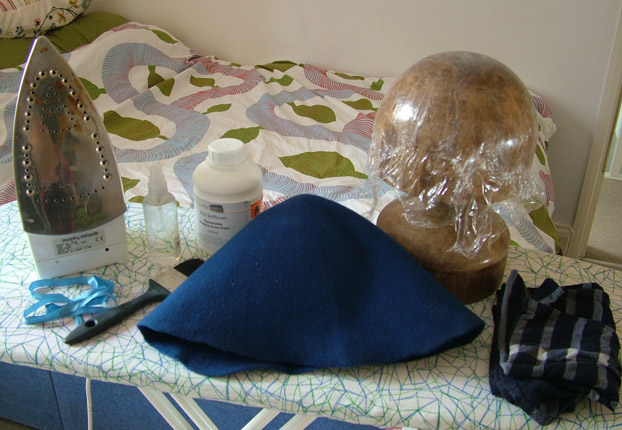
To block hats you’ll need the following:
- A paintbrush (I use a cheapy one about an inch and a half wide, though be aware that the cheaper brushes will malt all over the felt and you’ll need to pick these off)
- Felt stiffener
- A small bottle of water with spray nozzle and/or a wet flannel or old tea-towel
- An iron with a good steam setting
- A felt hood in your chosen shade
- A hat block
- Some clingfilm
- String or old ribbon
- Drawing pins and fabric pins
- Whatever ribbons, feathers or trimmings you might want to use.
(Please see the note on costs and sourcing below to find out about all these materials)
Ready? Set? Go!
1. First of all cover your hat block with clingfilm. This is to protect it from the water and the steam as much as possible.
2 .Now, turn your felt hood inside out, and paint it all over with the stiffener. There’s a bit of a nack to this – you want it to permeate the pile of the felt, but not come out the other side too much. I’ve found the best thing to do here is to not get too much stiffener on your brush, and use a stippling action to work it into the pile. You can always put more on at a later stage, depending on how firm you want your hat to be. Also be aware that too much stiffener can leave that side of the felt scratchy and marked. This isn’t normally a problem as this will be the inside of your hat, but if you intend to fold your brim over (for instance, for a tricorn hat) then what was once the inside will now be the oustide and fully on show.
3. Once you’ve covered the felt hood completely in stiffener, turn it inside out again (so that the right side is facing out once more) and put it on the hat block to dry. After 30mins to an hour the felt should be completely dry. Meanwhile clean your paintbrush- just dry it as best you can with some paper towels and wrap it in clingfilm. Do NOT use water – the stiffener reacts with water and essentially turns from a liquid to a solid. This is why it works with the felt – once the steam hits it the stiffener inside the felt reacts and holds the shape you want it to……but if you have a spare moment and want a laugh put a drop of stiffener in an old jug or cup, add some water and watch if puff out instantly into a sort of weird white…..stuff. Icky fun.
4. Fill your iron with water and set it to the steam setting. It’s a good idea to get somewhere well-ventilated for this – you’ll have the iron on the steam setting for a long time so unless you want to turn your place into a steam-room, it might be best to open a window. Once your iron is hot and ready, place the wet tea-towel or flannel on the felt hood and steam and iron over the top of it, pulling the felt down and stretching it as you go. This takes a lot of time and effort to pull and stretch the felt, so don’t get impatient, just keep going. You’ll want to manipulate the felt until you have a smooth shape over the crown of the block with no folds or bumps. Like I said, it takes a while, don’t give up! (If you’re feeling brave you can spritz the felt with some water and put the iron directly on the felt which is sometimes good to smooth out a particularly troublesome fold, but be careful as you can mark the felt like this sometimes). I’ve ironed my hands many-a-time here, so also be careful with that – it’ll be really, really hot, take it from me!
Note: Here if you want to make a trilby but don’t have the right shaped block you can use the side of your hand to mark the dent in the crown. You can basically shape it any way you want by manipulating it with your hands alone, though this is a bit trickier than just ironing it over a block or mold.
5. Here you can try the hood on or try to estimate or measure where you want your brim to start. Mark it by tying the string tight around the felt so that it is tight against the block. You can use drawing pins to stick it to the wood here but sometimes this too can leave marks in the felt so be careful. Any marks you do make here though can be covered with a hat band or ribbon, so don’t worry too much if it looks a bit untidy.
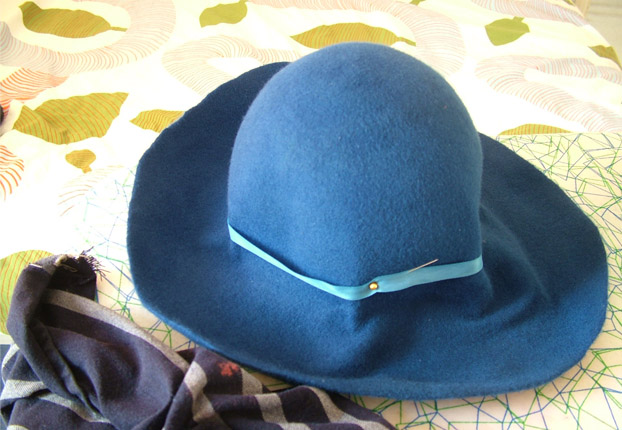
6. From here you can really go a bit freestyle with the design if you like. I don’t normally have a definite idea about how I want the hat to look as I’m still experimenting, so I usually just let the felt itself determine the style. You can put deliberate creases in by pinching the felt and ironing around it, pull the brim up, twist it around – whatever you like. However if you want just a basic cloche hat then I usually take the hat off the block (keeping the ribbon marking the end of the crown in place with sewing pins) and start ironing the brim flat on the ironing board. If you want a sloping brim you can use your hat block brim if it has one, or anything around the house that has the desired slope to it! You basically just want something hard to iron it against. If your brim is too floppy then you can stop, let it dry off (important, remember what I said the stiffener does when it meets water?) and then paint the inside again with more stiffener, then go back to ironing once it’s dry.
7. You’ll probably get some puckering around where the brim meets the crown – essentially you want the felt to shrink over the crown to fit the head, and then stretch where it meets the brim, which is a tall order. Just keep trying to iron out the puckering. Felt shrinks with heat and water so keep at it and it should smooth out. If you’re really struggling in the past I’ve tried getting the area that’s puckering really wet and sticking it in the airing cupboard for 24 hours to try to help it shrink. You’ll probably need to really pull at the felt brim to stretch it – this takes a bit of muscles and you’ll probably feel as if you’re not getting anywhere, but keep going, it’ll come!
8. By now you should have a hat-shaped object – well done! Now you can trim the brim to the size you want and start to think about the trimmings and finishing touches. You can roll the ends of the brim under and sew to give a nice finish, although I must admit I haven’t perfected this yet as it’s very hard to sew tidily in a circle on the felt on a sewing machine. If you’re a tidy hand-stitcher you could try it by hand, or leave it raw and trim it with ribbon or grosgrain ribbon, or just cut it tidily and leave it raw and un-trimmed. I sometimes use the excess felt that I’ve cut off from the brim as a hat band, or a bow, or fashion it into some kind of trimming for the hat. Go crazy! You can use ribbons, feathers, beeds, buttons, fabric, flowers, fruit, whatever you want!
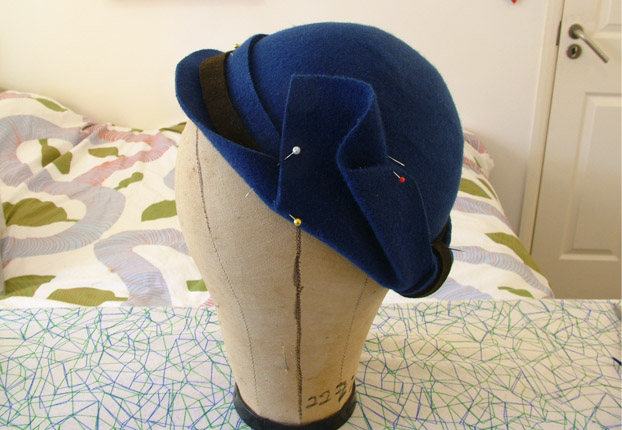
9. Aaaand that’s basically it. Here I’ve pulled the brim up and incorporated the folds into the design, using the excess felt as a band and also some excess from a previous brown felt hat I’d blocked. If there are places where your hat is a bit floppy, just paint the inside with a bit more stiffener, but don’t go too crazy with it. Remember that if your hat gets wet – or worse, hot AND wet – it might lose its shape. But now you know how, you can easily re-shape or block it.
Voila, with added feather (from my dad’s fly-tying box, thanks dad!):

Costs and sourcing materials and kit
You can buy trimmings, felt hoods, stiffener and hat blocks at a millinery supply shop like Atelier Millinery, or online – I like thetrimmingcompany.com. The felt hoods are normally around £5ish depending on size, the stiffener about £18 for a large bottle that’ll see you through about 6 or 7 hats. The hat block is the most difficult thing – hat blocks are wooden molds. The crown will be in your chosen hat size (measured around the widest part of your head) and you can sometimes get them with a detachable brim (though I’ve found the brim is not strictly necessary). They come in all shapes and sizes, and can be very expensive. However I believe you can hire them from somewhere like MacCulloch & Wallis off Oxford Street, or other millinery shops, but you may need to check this out. They also sometimes come up cheap on ebay, etsy or amazon. If this is still too expensive for you, you can search online for alternatives like plastic hat molds or polystyrene blocks, or buy some polystyrene and shape one yourself. I’ve even heard of people using upside-down bowls, or papier mache ones (though these would have to be incredibly thick and strong). The wooden ones are the best but they’re just stupidly expensive – I was very lucky indeed that my wonderful Grandpa turns wood and made me a basic round-crown block to my own sizing. This does mean though that I can currently only make hats for people with heads the same size as mine….
